SharePoint 2019 Workflows stuck on starting with error None of the trusted issuers specified by the server’s 401 challenge match the client’s known issuer

We recently deployed the Workflow Manager in SharePoint 2019 farm. After we deployed the April 2020 CU, the SharePoint 2013 style workflows were getting stuck on starting with the following error.

System.Net.WebException: The request was aborted: The request was canceled. —> System.InvalidOperationException: None of the trusted issuers specified by the server’s 401 challenge match the client’s known issuer ‘00000005-0000-0000-c000-000000000000@e2a61c0c-7b9c-4095-a643-554242c8cb17’. For reference, the following trusted issuers were returned by the server: 00000005-0000-0000-c000-000000000000*, 00000003-0000-0ff1-ce00-000000000000@e2a61c0c-7b9c-4095-a643-554242c8cb17.

The root cause of this error is incorrect RegisteredIssuerName in the SPTrustedSecurityTokenIssuer.

To resolve this issue,

  1. Start the SharePoint 2019 Management Shell using the Farm account
  2. Find the id of the existing SPTrustSecurityTokenIssuer using the cmdlet Get-SPTrustedSecurityTokenIssuer

    In the output, we need to look for the token issuers with the DisplayName as “00000005-0000-0000-c000-000000000000”. Copy the id which will be below the DisplayName

  3. Remove the existing SPTrustSecurityTokenIssuer using cmdlet Remove-SPTrustedSecurityTokenIssuer -Identity “Id we got in the step 2”
  4. Register new SPTrustSecurityTokenIssuer using the cmdlet

    If you are using https then

    New-SPTrustedSecurityTokenIssuer -Name “00000005-0000-0000-c000-000000000000” -MetadataEndPoint ‘https://workflowmanagerservername:12290/$System/$Metadata/json/1’ -RegisteredIssuerName “00000005-0000-0000-c000-000000000000@*”

    If you are using http then

    New-SPTrustedSecurityTokenIssuer -Name “00000005-0000-0000-c000-000000000000” -MetadataEndPoint ‘http://workflowmanagerservername:12291/$System/$Metadata/json/1’ -RegisteredIssuerName “00000005-0000-0000-c000-000000000000@*”

  5. Terminate the existing instance of the SharePoint 2013 styles workflows and re-run them.

You can find detailed information about this issue and it’s resolution here. https://techcommunity.microsoft.com/t5/sharepoint-support-blog/sharepoint-2019-issue-with-sharepoint-2013-workflows-post-april/ba-p/1440656

Posted in SharePoint 2019, SharePoint Designer 2013 Workflows, SharePoint Workflows, Workflow Manager | Leave a comment

PnP Provisioning Error: Field not found Issue with the Repost Page Content Type

Recently we encountered an error in the provisioning process using PnP Provisioning Engine in SharePoint Online. The processing process was working fine from last 1.5 years and suddenly in the middle of May 2018, it started failing with the following error message.

“Failed to apply template, retying in 1 min: Invalid field name. {746bb255-b0f7-47d5-9a3e-1c8e52468420}”. This field is part of the out of the box “Repost Page” content type.

To resolve this issue, we need to recreate the source template in SharePoint Online/Office 356. If you would like to know how I came to this conclusion, then continue reading.

When we encounter this issue, I have logged it on GitHub and found that few other folks also encountered the same issue. I did a quick POC and provisioning process was working as expected for newly created source site collections. I compared the schema of the old source and new source and found that the schema for “Repost Page” content type has changed significantly in last 1.5 years in SharePoint Online. One of the key change was the field “Authors” is no longer present in the new schema.

Old Schema:

<pnp:ContentType ID=”0x0101009D1CB255DA76424F860D91F20E6C4118002A50BFCFB7614729B56886FADA02339B” Name=”Repost Page” Description=”Create a new repost page.” Group=”Document Content Types” NewFormUrl=”” EditFormUrl=”” DisplayFormUrl=””>

<pnp:FieldRefs>

<pnp:FieldRef ID=”c042a256-787d-4a6f-8a8a-cf6ab767f12d” Name=”ContentType” />

<pnp:FieldRef ID=”5f47e085-2150-41dc-b661-442f3027f552″ Name=”SelectFilename” />

<pnp:FieldRef ID=”8553196d-ec8d-4564-9861-3dbe931050c8″ Name=”FileLeafRef” Required=”true” />

<pnp:FieldRef ID=”8c06beca-0777-48f7-91c7-6da68bc07b69″ Name=”Created” Hidden=”true” />

<pnp:FieldRef ID=”fa564e0f-0c70-4ab9-b863-0177e6ddd247″ Name=”Title” />

<pnp:FieldRef ID=”28cf69c5-fa48-462a-b5cd-27b6f9d2bd5f” Name=”Modified” Hidden=”true” />

<pnp:FieldRef ID=”822c78e3-1ea9-4943-b449-57863ad33ca9″ Name=”Modified_x0020_By” />

<pnp:FieldRef ID=”4dd7e525-8d6b-4cb4-9d3e-44ee25f973eb” Name=”Created_x0020_By” />

<pnp:FieldRef ID=”82642ec8-ef9b-478f-acf9-31f7d45fbc31″ Name=”LinkTitle” />

<pnp:FieldRef ID=”7efc33c1-b56b-490e-9c9b-1097e971ba96″ Name=”ClientSideApplicationId” />

<pnp:FieldRef ID=”daef58d7-ccfd-43fc-b776-2e292cc66bba” Name=”PageLayoutType” />

<pnp:FieldRef ID=”4966388e-6e12-4bc6-8990-5b5b66153eae” Name=”CanvasContent1″ />

<pnp:FieldRef ID=”5baf6db5-9d25-4738-b15e-db5789298e82″ Name=”BannerImageUrl” />

<pnp:FieldRef ID=”fb3259ac-bd07-4397-b7aa-03e885b0838e” Name=”BannerImageOffset” />

<pnp:FieldRef ID=”3f155110-a6a2-4d70-926c-94648101f0e8″ Name=”Description” />

<pnp:FieldRef ID=”f5ad16a2-85be-46b2-b5f0-2bb8b4a5074a” Name=”PromotedState” />

<pnp:FieldRef ID=”c84f8697-331e-457d-884a-c4fb8f30ea74″ Name=”FirstPublishedDate” />

<pnp:FieldRef ID=”261075db-0525-4fb8-a6ea-772014186599″ Name=”LayoutWebpartsContent” />

<pnp:FieldRef ID=”746bb255-b0f7-47d5-9a3e-1c8e52468420″ Name=”Authors” />

<pnp:FieldRef ID=”8a8804d8-ad51-48ef-9acf-0df7b3cc7ef6″ Name=”OriginalSourceUrl” />

<pnp:FieldRef ID=”0e7b982f-698a-4d0c-aacb-f16906f66d30″ Name=”_OriginalSourceUrl” />

<pnp:FieldRef ID=”36193413-dd5c-4096-8c1e-1b40098b9ba3″ Name=”_OriginalSourceSiteId” />

<pnp:FieldRef ID=”3477a5bc-c605-4b2e-a7c1-8db8f13c017e” Name=”_OriginalSourceWebId” />

<pnp:FieldRef ID=”139da674-dbf6-439f-98e0-4eb05fa9a669″ Name=”_OriginalSourceListId” />

<pnp:FieldRef ID=”91e86a43-75f2-426f-80da-35edfb47d55d” Name=”_OriginalSourceItemId” />

<pnp:FieldRef ID=”1a7348e7-1bb7-4a47-9790-088e7cb20b58″ Name=”_AuthorByline” />

</pnp:FieldRefs>

<pnp:DocumentTemplate TargetName=”/_layouts/15/CreateSitePage.aspx” />

</pnp:ContentType>

New Schema:

<pnp:ContentType ID=”0x0101009D1CB255DA76424F860D91F20E6C4118002A50BFCFB7614729B56886FADA02339B” Name=”Repost Page” Description=”Create a new repost page.” Group=”Document Content Types” NewFormUrl=”” EditFormUrl=”” DisplayFormUrl=””>

<pnp:FieldRefs>

<pnp:FieldRef ID=”8553196d-ec8d-4564-9861-3dbe931050c8″ Name=”FileLeafRef” Required=”true” />

<pnp:FieldRef ID=”fa564e0f-0c70-4ab9-b863-0177e6ddd247″ Name=”Title” />

<pnp:FieldRef ID=”4966388e-6e12-4bc6-8990-5b5b66153eae” Name=”CanvasContent1″ />

<pnp:FieldRef ID=”5baf6db5-9d25-4738-b15e-db5789298e82″ Name=”BannerImageUrl” />

<pnp:FieldRef ID=”f5ad16a2-85be-46b2-b5f0-2bb8b4a5074a” Name=”PromotedState” />

<pnp:FieldRef ID=”c84f8697-331e-457d-884a-c4fb8f30ea74″ Name=”FirstPublishedDate” />

<pnp:FieldRef ID=”261075db-0525-4fb8-a6ea-772014186599″ Name=”LayoutWebpartsContent” />

<pnp:FieldRef ID=”0e7b982f-698a-4d0c-aacb-f16906f66d30″ Name=”_OriginalSourceUrl” />

<pnp:FieldRef ID=”36193413-dd5c-4096-8c1e-1b40098b9ba3″ Name=”_OriginalSourceSiteId” />

<pnp:FieldRef ID=”3477a5bc-c605-4b2e-a7c1-8db8f13c017e” Name=”_OriginalSourceWebId” />

<pnp:FieldRef ID=”139da674-dbf6-439f-98e0-4eb05fa9a669″ Name=”_OriginalSourceListId” />

<pnp:FieldRef ID=”91e86a43-75f2-426f-80da-35edfb47d55d” Name=”_OriginalSourceItemId” />

<pnp:FieldRef ID=”1a7348e7-1bb7-4a47-9790-088e7cb20b58″ Name=”_AuthorByline” />

<pnp:FieldRef ID=”fb3259ac-bd07-4397-b7aa-03e885b0838e” Name=”BannerImageOffset” />

<pnp:FieldRef ID=”3f155110-a6a2-4d70-926c-94648101f0e8″ Name=”Description” />

<pnp:FieldRef ID=”5f47e085-2150-41dc-b661-442f3027f552″ Name=”SelectFilename” />

<pnp:FieldRef ID=”28cf69c5-fa48-462a-b5cd-27b6f9d2bd5f” Name=”Modified” Hidden=”true” />

<pnp:FieldRef ID=”822c78e3-1ea9-4943-b449-57863ad33ca9″ Name=”Modified_x0020_By” />

<pnp:FieldRef ID=”8c06beca-0777-48f7-91c7-6da68bc07b69″ Name=”Created” Hidden=”true” />

<pnp:FieldRef ID=”4dd7e525-8d6b-4cb4-9d3e-44ee25f973eb” Name=”Created_x0020_By” />

<pnp:FieldRef ID=”82642ec8-ef9b-478f-acf9-31f7d45fbc31″ Name=”LinkTitle” />

<pnp:FieldRef ID=”7efc33c1-b56b-490e-9c9b-1097e971ba96″ Name=”ClientSideApplicationId” />

<pnp:FieldRef ID=”daef58d7-ccfd-43fc-b776-2e292cc66bba” Name=”PageLayoutType” />

<pnp:FieldRef ID=”c042a256-787d-4a6f-8a8a-cf6ab767f12d” Name=”ContentType” />

</pnp:FieldRefs>

<pnp:DocumentTemplate TargetName=”/_layouts/15/CreateSitePage.aspx” />

</pnp:ContentType>

The following three reasons gave me the clue to the fix which is to recreate the template to fix the issue with the PnP Provisioning process.

  1. The PnP provisioning suddenly stopped working
  2. The PnP Provisioning process was working fine on newly created source sites
  3. The schema of the OOTB “Repost Page” content type is changed and the field “Authors” no longer present in the new schema

To recreate the template you can take the help of ISVs like ShareGate, AvePoint, Metalogix etc. Thanks for reading.

Posted in Office 365, SharePoint Online, SharePoint PnP, Uncategorized | Tagged , , | 1 Comment

Office 365: How to force log out multiple users using PowerShell Script?

To force log out users, we can use the Office 365 Admin Center or PowerShell.

In Office 365 Admin center, use the following the following steps.

  1. Office 365 Admin Center
  2. Users -> Active Users ->Select the User and in the OneDrive settings, click Initiate sign out.

If you would like to force sign out multiple users, you can also execute following script.

Import-Module MSOnline
$cred = Get-Credential
Connect-MsolService -Credential $cred
Connect-SPOService -Url https://yourdomainname-admin.sharepoint.com -Credential $cred

# To get all enabled users
#$users = Get-MsolUser -EnabledFilter EnabledOnly -All

# To get all the users of a Department
#$users = Get-MsolUser -Department ‘Department Name’ -All

# To get all the users
$users = Get-MsolUser -All;

foreach ( $user in $users){
Revoke-SPOUserSession -user $user.UserPrincipalName -Confirm:$false
}

Security Requirements: You need to be a SharePoint Online Global administrator to run the cmdlet Revoke-SPOUserSession.

The user will be signed out from all the sessions across all the devices.

It may take up to an hour for all sign-outs.

Note: If this is the first time you are running the PowerShell for Office 365, use the following two links to install the required tools.

  1. Connect to Office 365 PowerShell
  2. SharePoint Online Management Shell

Please post in the comments section, if you have more ideas for scripts.

Posted in Exchange Online, Office 365, Office 365 Group, Office 365 OWA, Office 365 Unified Group, Office365 OWA, Outlook 2016, PowerShell for Office 365, SharePoint Online, Uncategorized | Tagged , , , , | Leave a comment

New Book Released: PowerShell for Office 365

It gives me immense pleasure to announce that the book I co-authored with Martin Machado is released by Packt publishing. The title of the book is PowerShell for Office 365 and the contents are geared towards the administrators and the enthusiastic architects/developers who want to get their hand dirty with PowerShell to work with Office 365. You can check out the book here https://www.packtpub.com/networking-and-servers/powershell-office-365


Towards the end of last year, Packt publishing team approached me to check if I am interested in writing the Book on PowerShell for Office 365. Previously I acted as the technical reviewer and this was my first experience as an author of a book. Since I have a full-time job, I approached my good friend and mentor Martin Machado whether he would be interested coming on board as co-author for this book. He came on board and we signed the contract and started the work on the book.

The journey was eventful and very rewarding. I now finally get what it takes to write a book along with the full-time job. The work on the book was strictly limited to weekends and after office hours. While working on this book, I was also actively participating in the community activities and speaking at various conferences throughout North America.

The book covers,

  1. Chapter 1, PowerShell Fundamentals, covers the basics of working with PowerShell.
  2. Chapter 2, Managing Office 365 with PowerShell, explains the various PowerShell packages and permissions required to manage Office 365 through PowerShell.
  3. Chapter 3, Azure AD and Licensing Management, gives an overview of how to use basic PowerShell skills discussed in the previous chapter to create, manage, and remove Office 365 accounts and licenses. This chapter also addresses group management.
  4. Chapter 4, Managing SharePoint Online using PowerShell, focuses on tips and tricks working with SharePoint Online with PowerShell.
  5. Chapter 5, Managing Exchange Online using PowerShell, focuses on tips and tricks working with Exchange Online using PowerShell with practical examples.
  6. Chapter 6, Script Automation, explains taking a script and turning it into an automated process. This can be useful for repetitive tasks such as license and account management.
  7. Chapter 7, Patterns and Practices PowerShell, explores Office 365 PnP PowerShell to manage artifacts in SharePoint Online.
  8. Chapter 8, OneDrive For Business, explains OneDrive, which is another key component for the digital workplace. Individuals can safely keep/sync content on the cloud, making it available anywhere while businesses can manage and retain content securely. In this chapter, we go over common provisioning and management scenarios.
  9. Chapter 9, PowerShell Core, ends this book by covering how to use PowerShell on other platforms. It also explains how to use Office 365 APIs through remoting.

I would like to take this opportunity to express my gratitude and would like to thank following people for their support and encouragement.

The editorial team at Packt Publishing and technical reviewers, especially Rahul Nair, Sweeny Dias, and Khushboo Suthar for making sure the project gets completed on time and with quality contents.

My parents and the rest of my family for encouragement and support. Without their guidance, I would not have been where I am right now.

Above all my beloved and supportive wife, Mayuri Lahane for standing beside me throughout my career and writing this book. Without her constant encouragements, this book would not have been possible. More than often we had to sacrifice our personal time to focus on this book.

Martin Machado, a former colleague, good friend and the co-author of this book for his encouragement and constant support. We made it happen.

All my colleagues at Withum, Smith & Brown PC for their encouragement and constant support.

Last but not least: The Office 365 community for being such a great community and constantly encouraging and helping people by sharing knowledge.

If you happen to read this book, please feel free to reach out to me on pgbhoyar at gmail dot com if you would like to share the feedback or have any questions.

If you are from Washington DC metro Politian area, watch out for my upcoming talks or events. I will try to distribute the book as a giveaway.

Thanks for reading.
Posted in Azure, Exchange Online, Office 365, Office 365 Group, Office 365 Group ID, Office 365 OWA, Office 365 Unified Group, Office365 OWA, Outlook 2016, PowerShell Core, PowerShell for Office 365, SharePoint 2013, SharePoint 2013 Administration, SharePoint 2013 Development, SharePoint 2016, SharePoint Online, Uncategorized | Leave a comment

How to find ID of Office 365 Group?

Recently I worked on a Project where I had to provision and modify the Office 365 Groups using the Microsoft Graph APIs. During testing, I had to get the Group ID and pass it to a custom REST endpoint we had built. We used PostMan to test the endpoint. We can get the Office 365 Group’s ID using Microsoft Graph APIs. This approach is fine for the developers but we needed to involve a Power user in the testing. I started digging deep into the Office 365 Groups and that’s when I discover that there are multiple ways to find out the Office 365 group’s ID.

How to find ID of Office 365 Group?

Option 1)
Using Microsoft Graph

Option 2) Using User Interface (These steps are valid as of January 31st ,2017):

  1. Login to https://www.portal.office.com using Office 365 account.

  2. Click on the Mail Icon.

  3. In the Left-Hand Navigation, expand the “Groups” and click on the Office 365 group in consideration.

  4. Hover over “View group files and activity” and you will find the Group’s team site URL. If you are using Chrome, click on the “Copy Link Address” and paste the link in the notepad. You will find the Group’s team site URL in the following format. https://tenantname.sharepoint.com/_layouts/groupstatus.aspx?id=e90402f7-33d8-4322-b63c-eaab8b9e3ce6&target=documents . The ID here is the Office 365 group’s ID. For example, in this case, the ID of Office 365 Group is “e90402f7-33d8-4322-b63c-eaab8b9e3ce6”.

Option 3) Using Outlook 2016 (These steps are valid as of January 31st 2017):

  1. Expand the Groups in the Outlook and select the Office 365 group in consideration.

  2. Right click on “View group files and activity” and paste the link in the notepad. You will find the Group’s team site URL in the following format. https://tenantname.sharepoint.com/_layouts/groupstatus.aspx?id=e90402f7-33d8-4322-b63c-eaab8b9e3ce6&target=documents . The id here is the Office 365 group’s ID. For example, in this case, the ID of Office 365 Group is “e90402f7-33d8-4322-b63c-eaab8b9e3ce6”.

In Office 365 things change at fast space. If any of the above steps are not valid, please let me know in the comments section. J

Thanks for reading.

Posted in Office 365, Office 365 Group, Office 365 Group ID, Office 365 OWA, Office 365 Unified Group, Outlook 2016, Postman, Team Site | Tagged , , , , , , | 1 Comment

How to update the License information in Visual Studio 2013/2015?

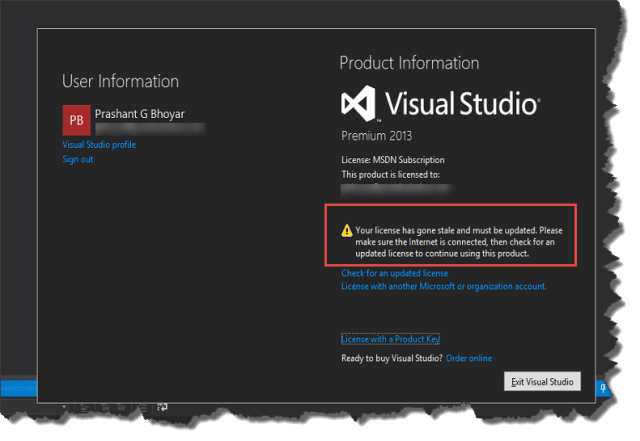
With the introduction of MSDN accounts in Visual Studio 2013/2015, we can now use the same settings across the different environment. Gone are the days where every time we start a new project, and use new server/machine we need to reconfigure Visual Studio settings as per our liking. However, this change comes with an annoying problem of Microsoft asking us to validate the account every 15-30 days as shown below.

“Your license has gone stale and must be updated. Please make sure the Internet is connected, then check for an update license to continue using this product.”

What if you are traveling and cannot connect to the Internet, but still would like to knock down some code? There is a way we can make this annoying validation process disappear for 6-9 months. For this, we need the Visual Studio 2013/2015 key. Depending on your role, you may or may not have access to the license key.

If you are a lucky one and have the license key, then click on “License with a Product Key”.

You are all set. Happy coding. J

Posted in MSDN, Visual Studio 2013, Visual Studio 2015 | Tagged , , , , | Leave a comment

SharePoint Workflows Migration Scenarios

With the introduction of Workflow manager in SharePoint 2013, we now have two SharePoint workflow engines, “SharePoint 2010 Workflow Host” and “Workflow Manager”. “SharePoint 2010 Workflow Host” is included with the installation of SharePoint 2010, SharePoint 2013 and SharePoint 2016 on premise.

We need to follow additional steps to install and configure “Workflow Manager” in SharePoint 2013 and SharePoint 2016 on premise. If you are using Office 365 /SharePoint online, both “SharePoint 2010 Workflow Host” and “Workflow Manager” are already installed and configured for you.

The workflows which use “SharePoint 2010 Workflow Host” for execution are called “SharePoint 2010 Style Workflows”. The workflows which use “Workflow Manager” are called “SharePoint 2013 Style Workflows”.


Unfortunately, we cannot automatically convert the “SharePoint 2010 Style Workflows” to “SharePoint 2013 Style Workflows”. The only option that is available is manual.

These two styles of workflows are sometimes confusing and I have been asked this question a lot during my SharePoint workflows talks, “What happens to the workflows post migration? Do they run as SharePoint 2010 style workflows or SharePoint 2013 style workflows?” Like any good consultant, my answer is always “Well it depends”. J

Depending on the scenario the answer varies. I have listed the scenarios and possible post migration outcomes in the tabular format.

Table 1: If you are migrating from SharePoint 2010 On Premise:

Existing Workflows in SharePoint 2010

Post Migration to SharePoint 2013 On Premise

Post Migration to SharePoint 2016 On Premise

Post Migration to Office 365 /SharePoint Online

SharePoint Designer 2010 Workflows

Run as SharePoint 2010 Style Workflows

Run as SharePoint 2010 Style Workflows

Run as SharePoint 2010 Style Workflows

Out of the box approval (OOTB) workflows

Run as SharePoint 2010 Style Workflows

Run as SharePoint 2010 Style Workflows

Run as SharePoint 2010 Style Workflows

Full Trust Visual Studio Workflows

Run as SharePoint 2010 Style Workflows

Run as SharePoint 2010 Style Workflows

Cannot migrate

Third Party SharePoint 2010 Workflows

Check with the vendor. J

Check with the vendor. J

Check with the vendor. J


Table 2: If you are migrating from SharePoint 2013 On Premise:

Existing Workflows in SharePoint 2013

Post Migration to SharePoint 2016 On Premise

Post Migration to Office 365 /SharePoint Online

SharePoint Designer 2013 workflows created as SharePoint 2010 Style Workflows

Run as SharePoint 2010 Style Workflows

Run as SharePoint 2010 Style Workflows

SharePoint Designer 2013 workflows created as SharePoint 2013 Style Workflows

Run as SharePoint 2013 Style Workflows (Provided Workflow Manager is installed and configured)

Run as SharePoint 2013 Style Workflows

Out of the box approval (OOTB) workflows

Run as SharePoint 2010 Style Workflows

Run as SharePoint 2010 Style Workflows

SharePoint 2013 Workflows created as App (using Visual Studio)

Run as SharePoint 2013 style workflow as App (Provided workflow manager is installed and configured)

Run as SharePoint 2013 style workflow as App

Full Trust Visual Studio Workflows

Run as SharePoint 2010 Style Workflows

Cannot migrate

Third Party SharePoint 2010/2013 Style Workflows

Check with the vendor. J

Check with the vendor. J


Table 3: If you are migrating from SharePoint 2016 On Premise:

Existing Workflows in SharePoint 2016

Post Migration to Office 365 /SharePoint Online

SharePoint Designer 2013 workflows created as SharePoint 2010 Style Workflows

Run as SharePoint 2010 Style Workflows

SharePoint Designer 2013 workflows created as SharePoint 2013 Style Workflows

Run as SharePoint 2013 Style Workflows

Out of the box approval (OOTB) workflows

Run as SharePoint 2010 Style Workflows

SharePoint 2013 Workflows created as App (using Visual Studio)

Run as SharePoint 2013 style workflow as App

Full Trust Visual Studio Workflows

Cannot migrate

Third Party SharePoint 2010/2013 Style Workflows

Check with the vendor. J


Please post in the comment box questions or if the above information is not correct.

Thanks for reading. Hope this was helpful.

Posted in Office 365, SharePoint 2013, SharePoint 2013 Development, SharePoint 2016, SharePoint Designer 2013 Workflows, SharePoint Online, SharePoint Workflows, Uncategorized, Visual Studio Workflows, Workflow Manager | Tagged , , , , , , , , , | 8 Comments

Podcasts I listen to..

So much is happening in the technology world and it is really hard to keep up with all the latest and greatest information. Podcasts are one of the mediums we can use to keep ourselves up to date. Since Podcasts are popular, there are tons of Podcasts available and it is getting increasingly difficult to find the right ones. In this blog post, I have listed the Podcasts which I have found extremely useful with a lot of excellent technical information and humor. 🙂

Another advantage of Podcasts is that they can help to utilize your commute/running time productively. I live in Washington DC metropolitan area and this region is known for crazy traffic delays. I used to get really annoyed with the traffic delays and was constantly looking for ways to get around this problem. I tried Music, radio stations but that did not help.

From last year, I started listening to the following podcasts and now I don’t get annoyed with the traffic delays. Now I can utilize my travel time more productively.

  1. Office 365 Developer Podcast : Jeremy Thake and Richard diZerega talk about Office 365 development. The one place to keep up to date on what’s happening in Office 365 development world.
  2. Microsoft Cloud Show : Chris Johnson and Andrew Connell talk about Microsoft cloud i.e. Microsoft Azure , Office 365, SharePoint, Skype for Business and related technologies
  3. Adventures in Angular : An Anjgular.js podcast
  4. Node Up : A NODE.js podcast.
  5. Brewery.FM : Dan Usher and Scott Hoag talk about the latest technology in the Microsoft space, focusing on public and private clouds. Tech, beer, Azure, AWS, Office 365, SharePoint and everything in-between.
  6. Digital Workplace Today Podcast : This podcast has good information about how Microsoft products can help you in the Digital Workplace. It covers all the of products under Office 365 suite.

If you know any good Podcasts related to Office 365 Development, Azure, SharePoint, Angular JS, Node etc, please let me know either by emailing me at pgbhoyar at gmail dot com or drop a line in the comments section.

Posted in Azure, Office 365, SharePoint 2013 | Tagged , , , , | Leave a comment

Eliminate The Paperwork Bottleneck With Custom SharePoint Intranet

Frustrated by the constant feeling of drowning in paperwork?

custom-sharepoint-intranet

If you’re annoyed by the slow response times or lack of accountability in your organization, your organization should seriously consider adopting a digital collaboration intranet solution.

As one of our clients learned, moving some of your workflows from a paper-based system to an electronic platform can fundamentally change how you do business for the better. Read on and see what a custom SharePoint intranet can do to reduce your business’ paper problem.

The Problem

Our client, one of the biggest nonprofit organizations in Washington, D.C., had a lot of paper-based processes in place. So whenever they wanted to implement or enact anything, physical sheets of paper had to make their way from one desk to another.

For example, to submit a payment request, people had to fill out a paper form and hand it to their supervisor, who would then pass it along to the accounting department, and so on. There was a lot of trekking through the hallways, and it was hard for the original requester to determine the progress of their application at any given time. In addition, because everything was done manually, most of the relevant information remained locked inside people’s heads.

Our Process

First, we had to get the essential elements of the system out of the heads of our client and into our own. We started by organizing a lot of discovery and requirements gathering sessions to pinpoint the sources of our client’s issues and find out what they needed from a solution. Based on these sessions, we created diagrams using Microsoft Visio that modeled their ideal workflow.

The second part of the process was building out the solution in a custom intranet portal in phases. Every time we implemented a few more requirements, we showed the results to the client to get their valuable feedback and modify our Microsoft Visio diagram. By the end, our diagram exactly matched the workflow of the custom SharePoint system we created.

The Result

The solution we created lets users keep track of the progress of their request at every step of the way. Whenever someone’s input is needed, the system automatically notifies that person with the relevant information. Everything is stored inside this custom intranet solution, so there’s no need to send or search for files yourself. Plus, because it’s done inside SharePoint, all the proper security measures are in place. Rather than being able to see sensitive information left on someone’s desk, employees can only see a particular electronic request if their input is required.

Obviously, there are a lot of benefits. It improves efficiency because you don’t have to print documents out or physically move things around. The progress of the request is transparent to anyone involved, and there’s no risk of losing documentation. And because it’s a custom SharePoint platform, people working remotely can still access it. In addition, if your business is audited, you have a clear “paper trail” of electronic log entries showing who approved the request and when.

Final Thoughts

With a manual, paper-based business process, technically the only restrictions are the limits of the human body. When you convert this to a custom SharePoint intranet, however, you must simplify and streamline the process so that it fits the technical limitations of the platform you’re using, while still ensuring the workflow runs as smoothly as it did before. It’s crucial to meet with management and other key stakeholder’s to identify the essential steps in the workflow that will be brought over to your new intranet solution.

Disclaimer : This article originally appeared on Portal Solutions’ Digital Workplace Today Blog

Posted in Office 365, SharePoint 2013, SharePoint 2013 Administration, SharePoint 2013 Development | Tagged , , , , , , , , , | Leave a comment

How to setup Gmail as SMTP Relay Server in SharePoint?

Emails are one of the important functionalities of SharePoint. Often when we create our own development environment we have to create our own SMTP server or rely on our company’s SMTP server (which may not be accessible outside company’s firewall).

My preferred route is to use Gmail as SMTP relay server because it is easy to setup up, free and my development environment can be completely isolated from my company’s infrastructure. We just need a valid Gmail account and our development environment should be connected to Internet. J

Here are the steps.

  1. Sign up for Gmail account if you don’t have one.
  2. Change the settings of the Gmail account and turn on the access to the less secure apps.
  3. Login to the SharePoint server (Windows 2008/2008 R2/2012/2012 R2) using admin account. The screen shots in this blog post are taken from Windows Server 2012 R2. If have already installed the SMTP server then skip the steps till 15.
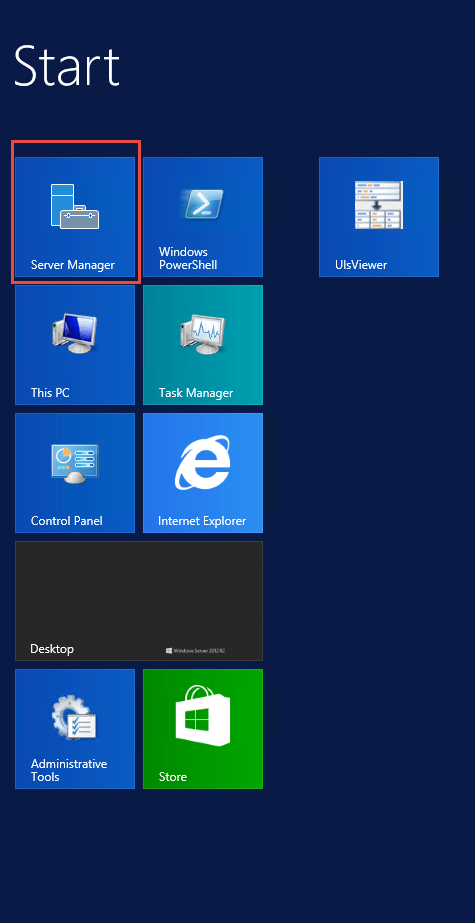
  4. Install feature “SMTP Server” using server manager. Open the server manager.

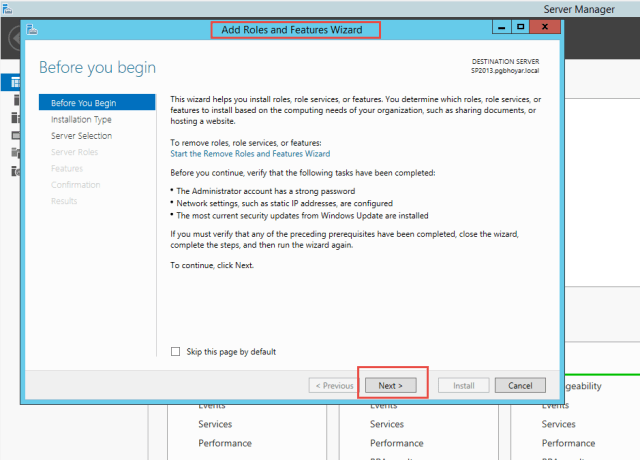
  5. Click on “Add roles and features”.

  6. Click Next.

  7. Select the “Role-based or feature-based installation” and click next.

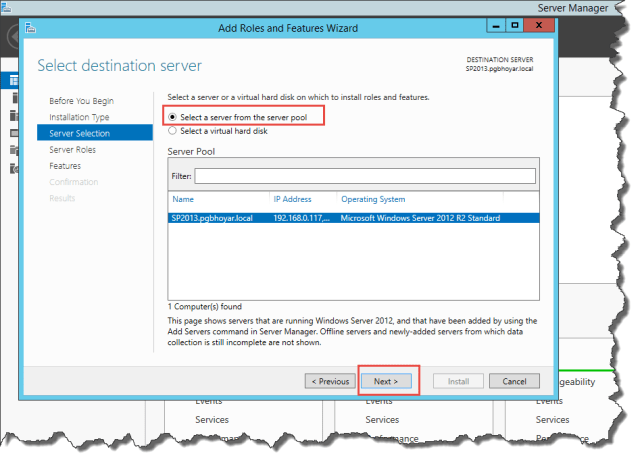
  8. Select the “Select a server from the server pool” and click next.

  9. Click Next in the “Server Roles”.

  10. Scroll down and select “SMTP Server”.

  11. A pop will show up to install the pre requisites. Click on “Add Features”.

  12. Click Next.

  13. Confirm the installation by click “Install”. The installation will take 2-5 minutes depending the server resources.

  14. We will see following message after successful installation. Click “Close” to exit the wizard.

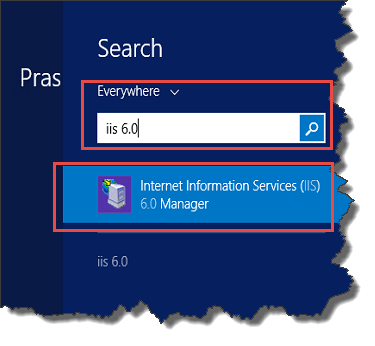
  15. Now search for IIS 6.0 in the Search bar.

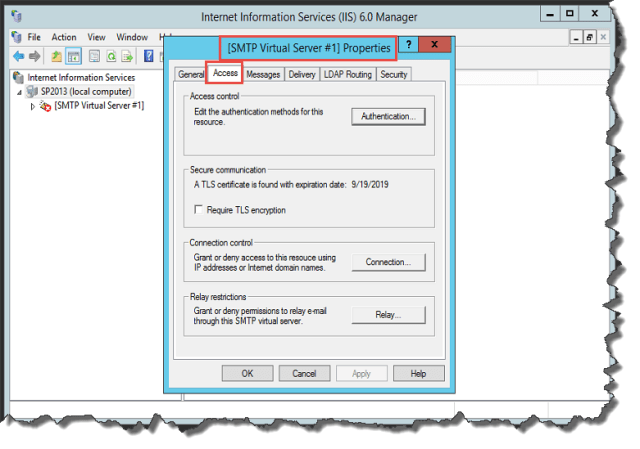
  16. Expand the “Local Computer” and Right click on the “SMTP Virtual Server” and then click Properties.

  17. Click on the “Access” Tab.

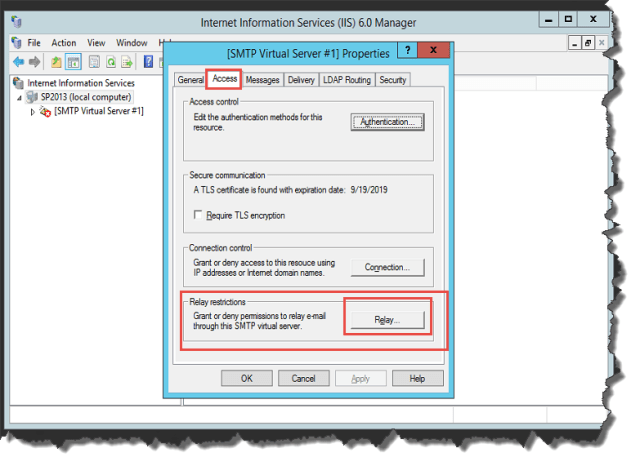
  18. Under “Relay Restrictions” click on “Relay”.

  19. Select the Check Box “All except the list below” and then click “OK”.

  20. Then click on the “Messages” tab and make sure following settings are there.
    1. Limit messages size to (KB) = 2048
    2. Limit session size to (KB) = 10240
    3. Limit number of messages per connection to : 20
    4. Limit number of recipients per message to: 100
    5. Badmail directory : C:\inetpub\mailroot\BadmailA

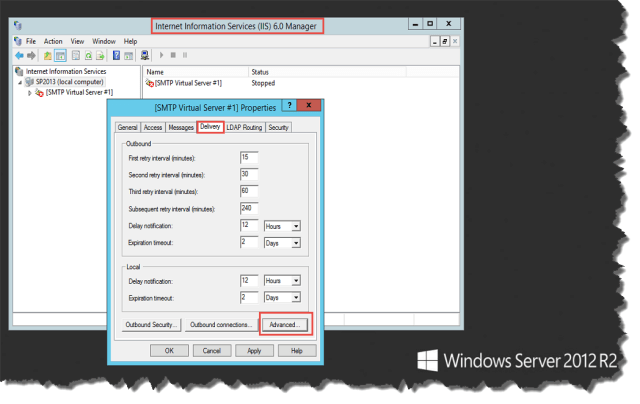
  21. Click on the “Delivery” tab and then click on “Outbound Connections”.

  22. Select 587 as TCP port instead of default 25 and then click “OK”.

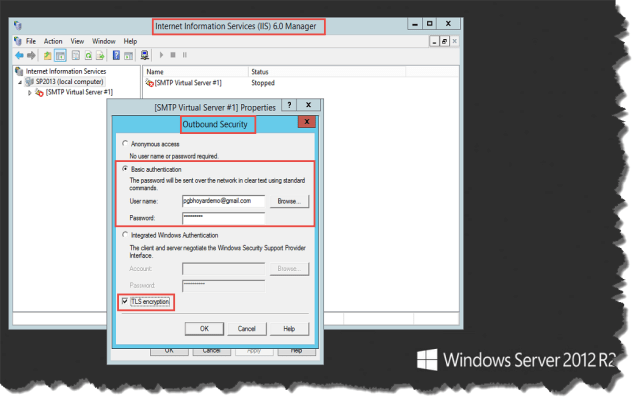
  23. Click on “Outbound Security”.

  24. Select “Basic authentication”. In the user name enter valid Gmail address and the corresponding password of the Gmail account. Select the check box of “TLS encryption” and then click OK.

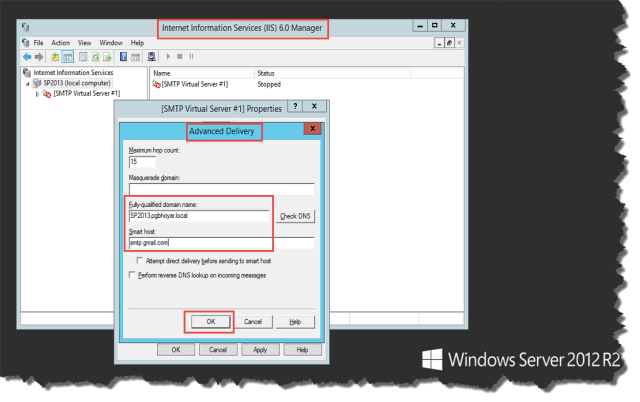
  25. Click on “Advance”.

  26. Enter the following information and then click OK.
    1. Maximum hop count: 15
    2. Fully-qualified domain name: FQDN of the server. If
    3. Smart host : smtp.gmail.com

  27. Click “OK” and Apply and then OK.

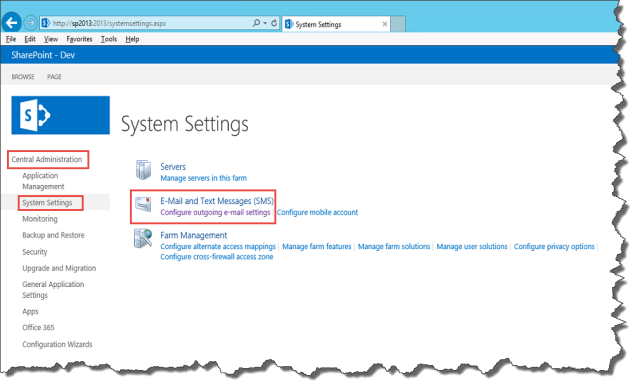
  28. Now open the Central Administration ->System Settings->Configure outgoing e-mail settings. The following screen shots are from SharePoint 2013. The same steps can be used in SharePoint 2010.

  29. Enter the fully qualified domain name of the server in the “Outbound STMP server” and then click “OK”.

  30. To test the outgoing emails are working, setup “Out Of The Box” alert on any SharePoint list or library.

Happy Learning. J
Posted in SharePoint 2013, SharePoint 2013 Administration | Tagged , , | 1 Comment